How Do I Wire my Add-on Lights?
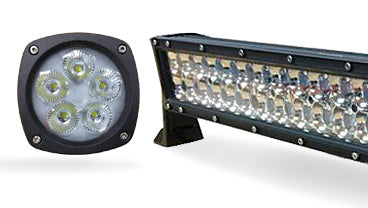
When you order add-on accessory lighting for our headache racks, most of the time (with the exception of long LED light bars) the units will be pre-installed in the rack - but not pre-wired. Why don't we fully wire it for you or supply wire and switches? There are a couple of reasons. One is an effort to keep costs down. The other is we don't know where you might want to wire it into your truck or the method you might want to use. Do you want it to come out on the right side or left? Will it need to go into the cab and be switched or tie into the vehicles' rear harness? Do you want to control your lights through an existing switch or add one somewhere? There are many ways to do it and the needs will vary from customer to customer.
If you're not comfortable doing the wiring yourself then we suggest talking with your favorite mechanic or even the service department at a local RV/Trailer dealer. If you're a DIY kind of person, we can offer some tips...
Whether the lighting unit is pre-installed or shipped separately it will include a pigtail connector. You'll need to supply the wire and switches from that point forward and will find what you need at most any auto parts store.
If you ordered lights the rack will be pre-drilled near each light mount and at each lower corner so that wire can be chased through the tubing for a 'clean' install. If you ordered no lights, there will be no holes. It may be easier to chase the wiring before the headache rack is installed using a fish tape or a rigid piece of wire with a loop on the end. The idea is to push the rigid wire through the tubing, tie your electrical wires to the end and then pull that wire back out with everything attached. It may take a little patience and fiddling, but you'll get it.
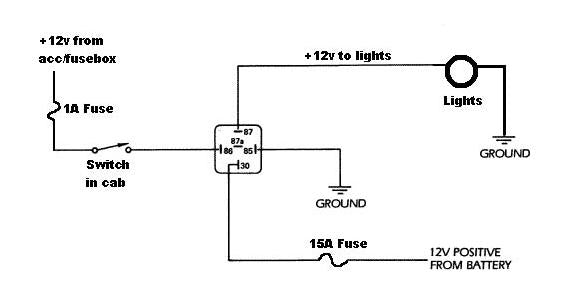
It's also important to remember that unlike an incandescent style light bulb, LED units are polarity sensitive - meaning if you hook them up backwards, you won't damage them, but they won't light up. All the black wires from pigtails need to be connected to a good chassis ground. The red wires need 12 volts from a power source. It's always advised to use a properly rated fuse in the wire supplying power to the lights to protect the wiring and truck in the event of a short circuit. If you're installing multiple or large lighting units that draw more current, you should also consider wiring a relay into the circuit. The relay lets you use a very small amount of current at a toggle switch on your dash or elsewhere to safely switch a larger amount of current, on or off, through the relay.
If you ordered our Brake/Turn LED option the wiring is a little different. You'll want to tap into the vehicles' rear lighting harness. Currently, the oval shaped brake/turn LED lights have 3 wires wires: Red, Black, and White. Black needs to be connected to a good chassis ground. The red wire is for the brake/turn function. White is for running lights. (The standard is black for running and white for ground but some manufacturers may swap colors. Check for markings on the back of the housing). Oh, and when you install the lights into the rack it's easier to install the black rubber gasket first. Once secure in the opening, you can push the lamp into the gasket.
NOTE TO LATE MODEL FORD OWNERS: If you have a factory towing package that senses when a trailer is connected and turns on a dash light, you won't be able to do any kind of inline tap into that circuit or harness normally used for the trailer lighting - which is commonly done. If you do, the trucks computer will sense the small electrical load and assume you have a trailer hooked up. The workaround will be to tap into the harness feeding the brake lights. Our understanding is the computer doesn't monitor that circuit/harness and the warning lamp will not be turned on.
A quick search online will turn up lots of simple diagrams for wiring auxiliary or off-road lighting. Here's one example from lightbarreport.com where you'll also find some additional tips and information.
